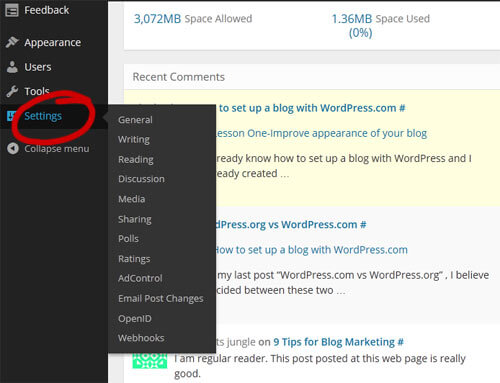
We learned “how to manage the Posts section on WordPress” in our last post. This post will teach us about your WordPress admin dashboard’s ‘Settings’ tab. This is one of the most essential tabs of your blog because it controls its overall behavior and pattern. There are several links under the ‘Settings’ tab, which is “General,” “Writing,” “Reading,” “Discussion,” “Media,” “Sharing,” “Polls,” “Ratings,” “Ad Control,” “Email Post Changes,” “OpenID” and “Webhooks” as you can see in the image below:
Let’s talk about these links one by one:
Option One: General
In the ‘General’ section, you can manage the general attributes of your blog like the title of your blog(which appears on the top of the blog- In my case, it’s Bhupesh Kalra), Tagline(which appears under the blog title- In my case, its Consultant for Web Development, Blog Marketing, eCommerce, Search Engine Optimization & Mobile Applications), Email Address(all the emails related to the blog will be sent to this email ID), Timezone(You may set your local timezone and the blog posts will show the correct time along with the publishing details), Time Format(the way you want time to be displayed) and the Language in which you wish to publish the posts.
You must be careful while deciding on the blog title and tagline because users like to scan the whole blog in a few seconds before they start reading any of your blogs or pages completely. The blog title and tagline help them learn about your blog/website at a glance.
The “General” section also allows you to upload an image that will be displayed everywhere on WordPress.com.
Option Two: Writing
In this section, there are a few options that you can control for your writing pattern, like below:
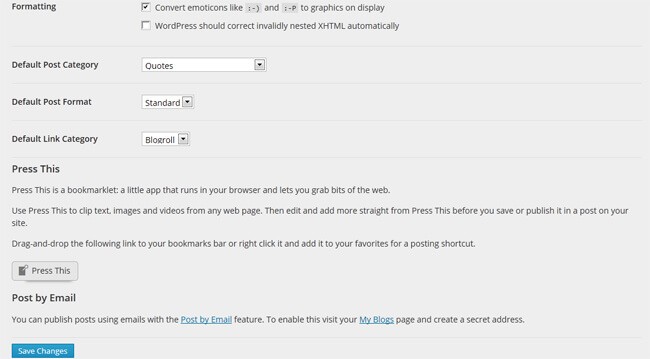
a) Formatting: Two main options exist for setting the formatting style. The first option is to convert emoticons to graphics like :-), which will automatically change the characters to their emoticons. The second option is to correct invalidly nested XHTML automatically. The latter option is recommended for advanced web developers only.
b) Default Post Category: You may select the category that should be selected by default when you create a new post.
c) Default Post Format: There are many post formats, such as chat, gallery, image, etc. You may select any of these options, which will be selected by default when you write a new post. For example, you may add more images to your blog each time you create a new post rather than writing on it so that you may select the default post format as “Image.” However, please note that these options will work only if your chosen theme supports them.
d) Default Link Category: You may select the link category, which should be selected by default when you create a new post.
e) Press This: This option lets you install an application in your bookmark bar to copy and paste texts, images, and videos directly into your WordPress post to edit or add more. This tool helps save time when copying and pasting using different browser tabs. If you are a blogger who writes on topics based on ideas & facts from various sources, this tool is perfect for you.
f) Post by Email: Using this tool, you can post & publish blog posts through emails only. This is particularly helpful when you invite other bloggers to write for your blog and don’t want them to create accounts on your blog. Using this tool, other bloggers can send their stuff through email, and those posts will be published on your blog without you creating an account for them. How to do this? Just visit the link http://yourblog.wordpress.com/wp-admin/index.php?page=my-blogs and generate the email IDs through which you want the blogs to be posted. It’s as simple as that!
Option Three: Reading Settings
In this section, you will find various options to change how users and search engines read your blog. Let’s see those options one by one:
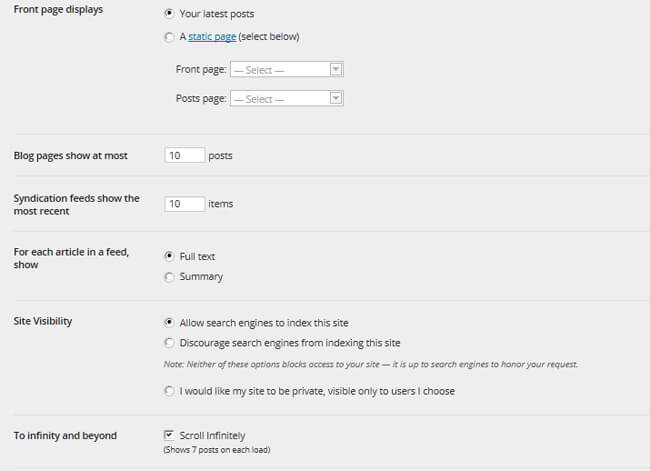
a) Font Page Displays: This option allows you to select the posts or pages that you want to show users when they land on your website or blog’s homepage.
b) Blog Pages Show at Most: This option lets you select the number of blogs to appear on the blog’s main page (landing page)
c) Syndication Feed Show the Most Recent: This option lets you select the maximum number of posts that will appear on the RSS feeds.
d) Show a summary or full text for each article in a feed: This option lets you decide whether to show a summary or full text of your posts on RSS feeds.
e) Site Visibility: You may want your blog or website to be unsearchable by search engines; this option enables you to do this. You may also opt for specific users to view your blog or website.
f) To infinity and beyond: This option decides the number of posts you want displayed on your blog’s front page.
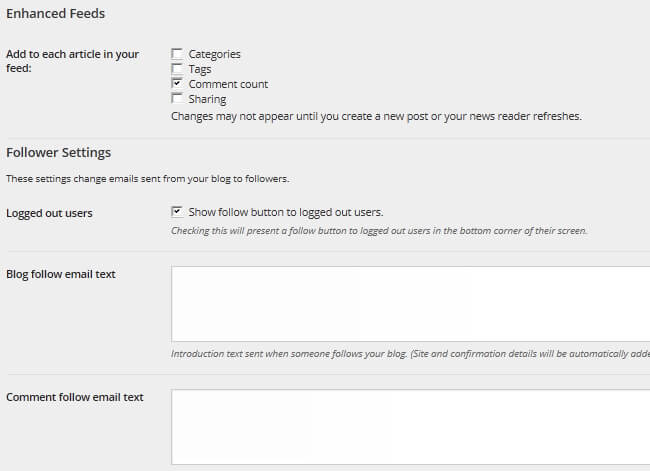
g) Enhanced Feeds: You can incorporate a few settings into the posts for your feeds. For example, you may display categories, tags, the number of comments, and sharing options along with each post on your feed.
h) Follower Settings: Here, you can have a few settings for the emails sent to your followers from your blog. You may customize the message of those emails. You may compose/edit a separate message for users who start following your blog post, or you may set a message for users who have started following your particular blog post.
Option Four: Discussion
This section decides the behavior of links and comments on the blog posts. Again, this section has several options for settings, so let’s discuss them one by one:
a) Default Article Settings: Through these setting options, you can decide (i) Whether y
You want/don’t want a notification to be sent to other blog owners if you are using their blog post links to include in your blog post (ii) Whether you want/don’t want to accept trackbacks and pingbacks from other blog posts if they are using your blog links within their post and (iii) if you wish to allow people to comment on your new articles or not.

b) Other Comment Settings: These settings decide the rules of the commenting process on your blog. For, e.g. you may set conditions like (i) Whether the commenting authors should/shouldn’t fill in their name and email ID before they can comment on your blog post, (ii) Users must/must not be registered to comment on your blog posts (iii) Whether you want/don’t want to close the commenting option after the expiry of a certain number of days (iv) Setting up the levels for nested comments which means how many users can further comment on a particular comment which has already been done by some other user on the same blog post (v) How many top-level comments you want to show per page & (vi) The setting for comments to appear on your blog post (date-wise ascending or descending order).

c) E-mail me whenever: You can set this option to receive email on various events when (i) Anyone comments on your post, (ii) A comment is made and held in moderation, (iii) Anyone likes your post, (iv) Anyone reblogs your post (v) Anyone follows your blog.

d) Before a comment appears: This option lets you set the condition to approve the comment before it starts appearing on your blog post. You may also set the condition that if an author has already commented(approved) on any of your blog posts, you won’t require approval for any of their comments in the future.
e) Comment Moderation: This option is used to decide the behavior of the comment moderation system. It has three further settings: (i) “Don’t discard spam on old posts,” which means that if a comment is made on a post that is as old as 30 days or more. It is suspected spam by Akismet(Anti-spam software for WordPress) and will be automatically deleted. (ii) You may set to hold a comment for moderation if it contains a certain number of links in it & (iii) You may set a few words, and if those words are found within any comment, it would be held in the moderation queue(please note that this option works in ‘broad matching’)
f) Comment Blacklist: Through this option, you may input a few words which, if found in any of the comments, will be marked as spam. Again, the point to be noted here is that this option works in ‘broad matching’, which means if you set the word ‘new’ as one of the blacklisted words, words like ‘news’, ‘newsletter’ etc. will also be blacklisted.
g) Follow Comments: You may have an option of ‘follow comments’ within the comments form so that the authors commenting on your blog posts may get a notification whenever a new comment is made on that specific blog post.
h) Follow Blogs: This option enables you to provide a link to follow the blog within the comments form so that whenever a new blog post is published on your blog, those followers will receive a notification.
i) Avatar: Do you know what an avatar is? An Avatar is an image that appears with your name and is displayed whenever you comment on any of the blogs. This option lets you do settings for Avatar like (i) Whether you want to display the avatar of authors who comment on your blog post or not (ii) Whether you want/don’t want to show the information of authors on mouse-over of their respective Gravatar (iii) Set the maximum ratings for the avatar of authors who are commenting on your blog post & (iv) What kind of default Avatar icon you want to show for the authors who comment on you blog post. This default Avatar icon will appear only if they don’t have any Gravatar.
j) Comment Form: This option lets you set the label for your comments box.
In this blog post, you learned about the options under the first four links of the Settings tab. You may like to review these options and try them on your blog. In my next blog post, I will explain more links under the Settings tab.